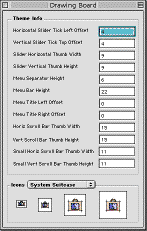
The main window contains values that you can edit, such as the menu bar height or the width of the scrollbar thumbs. Note that changing some of these values might still require you to edit the affected layo(s) to get the value to display correctly.
In brief, what the various items in the window describe:
Slider Tick Offsets - These affect where the first of those little tick marks gets drawn for sliders.
Thumb Widths - This is how large the thumb width is supposed to be, note that due to how these are drawn, most of the time you will have to set the actual size seperately in the layo though.
Menu Title Offsets - These determine where the pulldown menu is actually drawn, in comparison to where the menu text is.
Menu Seperator - This is how large an area is reserved for the line that seperates different items in menus.
Menu Height - How many pixels high the menu bar is expected to be (and usually drawn, though again it depends on how the layo is set up).
These items can also be found (and edited using something like Resorcerer and a copy of our templates) in the tdat resource, along with some other items not yet present here. More information about the tdat resource is available in the resource documentaiton at our website.
You can now copy & paste icons, although there are probably better programs to do this with. Use the popup menu to select the icon to edit (note that the icon currently has to be present in the appearance already for it to be available in the menu). The easiest way to add icons to an appearance that doesn’t have them is to copy the appropriate resources from a theme that does and edit those.
You’ll need to copy all the icns (icon suite) and tic# resources from the donor appearance to the one you’re working on. There should be quite a few of the icns resources and one tic# resource (id 384). The tic# resource contains a list of all the icns resources used by the appearance, if you want to add any new icns resources you will need to edit the tic# resource with a resource editor that supports that resource type or uses our templates to support that resource type. Both Resorcerer and Resurrection either support the tic# resource directly or work with our templates.
Resorcerer is a commercial resource editor, you can find out more information about it at their website: http://www.mathemaesthetics.com
Note that there seems to be a problem with the way icons are handled in the System that can cause crashes with versions of the Mac OS before 9.0 when switching to themes with new icons.
The palette windows now behave more like palettes and all the window positions are saved in the theme you're working on. At the current time some of these don't disappear when you switch context to another program.
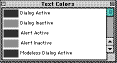
Text Colors
These control the various text colors used in windows and other parts of the appearance. As with all colors & patterns in Theme Machine, you can edit the individual color/pattern by double-clicking on it. This brings up a dialog that lets you paste in the color or pattern (or in the case of this palette) brings up the color picker directly since you can't use a pattern for a text color.
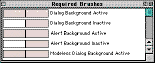
Required Brushes
These are things like window backgrounds, though the inactive window backgrounds don’t actually seem to be used for anything. They might be used by some future revision of the system software though, so you might as well set them up how you'd want them to work, in an ideal world. The box on the left shows the pattern (if any) assigned to this item and the one on the right shows the standard color assigned to this item.
These items (and more not present here) can also be seen (and edited, etc.) in the clr# resource using one of the resource editors that support our templates.
A blank item in the list is an item for which no definition has been entered, but has an entry defined for it in the resource. At present I believe the only one used is for that annoying little non-blocking alert window in OS 9.
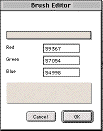
Brush Editor
Since I brought it up, this is what the brush editor looks like. You can edit the entry by one of three ways: by double-clicking the top box (which represents the standard color), by editing the three RGB values directly (typing in numbers from 0-65535), and by pasting in something to the larger bottom box. The picture shows the top box with focus, you'll have to click on the bottom box to direct the focus there before copying or pasting though.
You can also drag & drop colors/patterns from one palette to another (both the color and pattern get copied).
One more thing about using patterns in these window backgrounds - they can cause problems (or glitchy looking graphics) if the programmer of the application didn't follow the Appearance programming guidelines correctly. This isn't an uncommon occurrence and we're working on putting together help for people about how to better get their code in order.
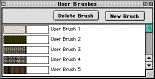
User Brushes
These are all other brushes present in the theme. You’ll probably use these for a large variety of things (frmes, among other things). The brushes can be either a solid color (the right box) or a pattern (the left box). The new brush button creates a new brush entry (defaults to black). Deleting a brush will remove the highlighted brush - but be aware that this may cause undesirable results due to how brushes are referenced. To be more precise, the brushes are referenced by number, if you delete a brush not at the end of the list, all objects that reference brushes after the one you deleted will be offset by one (and that's not good for anybody). A better choice would be to change the brush you don't like if it's in the middle of your list, or to ignore it. You can't delete a brush reference from the brush editor, but you can drag & drop a brush that doesn't have one and then edit the color.
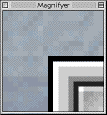
Magnifier
This provides a real-time magnifying effect where the cursor is positioned. This can be useful when you’re testing something out and want to get a magnified view to make sure it’s working correctly. The magnify palette is meant to work when context is switched outside of the program (which lets you magnify wherever you like) so don’t include it in the misbehaving palette list.
Brush patterns
One thing you need to be aware of is that the brushes you paste are subject to manipulation by Quickdraw to fit into an appropriate color space (or something like that). That means that you'll want to use 32-bit (as in, you should be in 32-bit color mode on your monitor) brushes for best results and switch to an indexed color space in Photoshop before you copy & paste that data into Theme Machine. The color results with indexed color seem to work out better, and it avoids a bug in the paste routine that can introduce some extraneous color information). I generally (when I remember about it) use a Photoshop action to do this so I don't have to step through the dialogs. If you have another program you like to edit and/or create ppat resources with, you can assign patterns directly to the colors by editing the plut resources in the theme file and an appropriate resource editor.
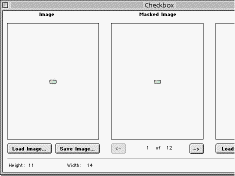
The pxm# is the object to use when you need to mask off part of the data, and the pxm# editor has received a considerable amount of attention in this update.
Since we've spent a considerable amount of time benchmarking what objects draw the fastest, we didn't think it was worth supporting the comparatively slow indexed color pxm# that you probably wouldn't be happy with anyway. All pxm#s are now saved as speedy 16-bit non-indexed parts, we'll be working on introducing support for 32-bit parts (like used in OS X) in a future revision of the program.
The color handling routines have also been reworked, this should allow you to throw away Pixie. Well, maybe not. Sometimes Pixie comes up with better color information (dithering, or lack thereof), though I'm not sure why that is. Be sure to convert to an indexed color space before copying the image you want to paste into the pxm# window for best results.
This version also shows the index of the image you’re working on (e.g. 1 of 12) and the dimension of the pxm#.
To paste an image into the window, first you need to direct focus to the approriate area, you can copy from all three but can only paste into the Image and Mask areas. The Masked Image area shows you what the image will look like when displayed.
Another new feature is that the size of the pxm# will automatically scale to the size of the image you're pasting in. Any additional items in the pxm# (such as the Mask) are scaled to the new size (but you'll probably want to edit them by hand anyway).
Until we get the layo editor in shape, you should only do this if you are comfortable with editing the respective layo resource(s) that reference this pxm# with a resource editor that handles our templates (and unless something has changed in the last month or so, that means Resorcerer since Resurrection didn't support our layo template).
Load Image/Mask works like you'd expect, it works with PICT files.
An Important Note:
One bug you should definitely be aware of is that to ensure that the colors used for the pxm# are correct when you bring up the editor you should open one of the other editor types (frme or layo) first. If you don't, and don't replace all of the individual items (except for the mask) then some of the images may have the color data corrupted. It's pretty obvious when it happens, if it's not obvious to you that this is the case with the theme you're working on then you probably don't have to worry about it. Again, this is something we'll fix in a future revision of the program.
You can also view (but not edit) the pxm# resources with Holger's PixelWizard apprentice for Resorcerer, though it hasn't been worked on in a while.
This is all new. The frme can be used to draw many aspects of the appearance and now we have a GUI editor to help you edit them. It isn't completely finished, but compared to how you used to have to do them, we think you'll be pretty happy with it.
There are two types of frme - required and user, accessed through the appropriate menu. The required ones are those that are referenced exclusively by the System, user ones are those that are referenced through a layo resource.
First, just a general overview of the window and how frme resources work.
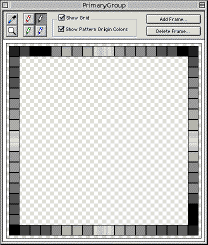
You can think of the frme resource as a series of rectangles drawn around the bounds rectangle that refers to it (from the layo). Each rectangle can be assigned to be drawn at a certain layer. Ones that are drawn inside the bounds rect are assigned positive numbers and those that are outside are assigned negative numbers.
Each pixel in the frme can be defined independently of the other ones, though when Theme Machine builds the actual construct a lot of unique pixels are going to make the size larger. You can also have the pixel draw a pattern, as shown by the middle section in the picture.
Since the frme resource is made up of scalable parts, objects made using this resource type can be resized without too much worry.
The checkered background represents what isn't drawn. In this case you can see that it's drawing a frame with no center (perfect for a primary group item, which it is).
The frme editor tools
Eyedropper
This allows you to find the underlying color in the brush list, it switches back to a pencil after you use it.
Magnifying glass
This allows you to zoom in or out (hold down option key) so you see the frme in different sizes.
Different colored pencils
Not implemented yet. This will allow you to set the origin of a brush pattern (top-left, top-right, etc.)
Show grid
This allows you to turn off the grid display so just the brush colors are shown. You’ll definitely want to do this when you zoom all the way out. The grid origin colors work, but you may want to turn them off if they distract you.
Add frame
This allows you to add a layer to the interior (positive) or exterior (negative) of the content region. This lets you add to the complexity of the frme.You won’t always be able to see any exterior layers that you create, whether you will or not depends on what it is.
Delete frame
This lets you remove a layer from a frame.
Note that all of the frmes currently created by the editor are currently the more complex variety (better than the reverse) which use two bytes to represent a side. The memory overhead is small though, so that won’t be an issue. We will eventually support the less complex single-byte version.
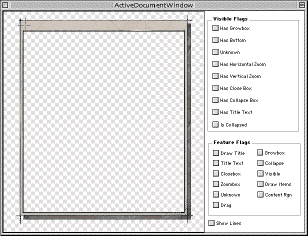
The layo editor is currently unimplemented, but you can use this as a preview approximation of how the various layo items will look with the current appearance. Note that some items won’t look like they would in the real world since the content size is constant (and suited to a window).
Unfortunately there are always bugs - these are the ones we know about and possible workarounds to them.
The pxm# editor colors are initially not displayed correctly.
This happens with pxm# resources that initially were indexed, you can fix this by first opening a frme or layo editor window.
The pxm# or brush I pasted has incorrect colors on the horizontal boundry edge.
This happens sometimes when the item you’re pasting has an even width, possibly in the pattern (2,4,8,16...). Using an odd width seems to fix this.
Note - This is only a partial list of the known bugs. Please see our bug tracking area at: http://sourceforge.net/bugs/?group_id=2903 to see if we know about a bug, or to report a new one.